Cleaning a chemical tanker interior is a controlled safety operation, not a simple washing task. This introduction explains how to clean the interior of a chemical liquid tanker with practical attention to residue, ventilation, inspection, and documentation. Each cargo leaves a different fingerprint. Some residues form a thin oily film, while others dry into hard crystals around valves, corners, and heating coils.
Captain Pradeep Chawla, a respected maritime operations specialist, has said, “Safety is not a checklist; it is a discipline repeated before every operation.” That principle guides every reliable tank-cleaning plan. Operators should review the previous cargo, obtain the correct safety data, isolate equipment, and confirm the approved cleaning method. Never enter a tank without tested atmosphere conditions, formal authorization, and suitable rescue arrangements. Small details matter. Check the manlid gasket. Inspect the spray head. Record the rinse-water appearance.
Water temperature, detergent compatibility, cleaning pressure, and contact time must match the cargo residue. Excessive pressure can damage coatings or spread contamination. Weak ventilation may leave dangerous vapors in hidden spaces. These risks are easy to underestimate. They should not be.
This guide also considers China’s top ten chemical tanker cleaning practices, including pre-cleaning assessments, closed-loop washing, manual inspection, and final wall-wash verification. However, no universal procedure fits every tanker or chemical product. That is an uncomfortable limitation. A clean-looking surface may still fail laboratory testing. Experienced crews therefore combine visual checks, measured readings, cargo history, and independent inspection. The goal is not merely a bright tank. It is a demonstrably safe, compatible, and cargo-ready interior.
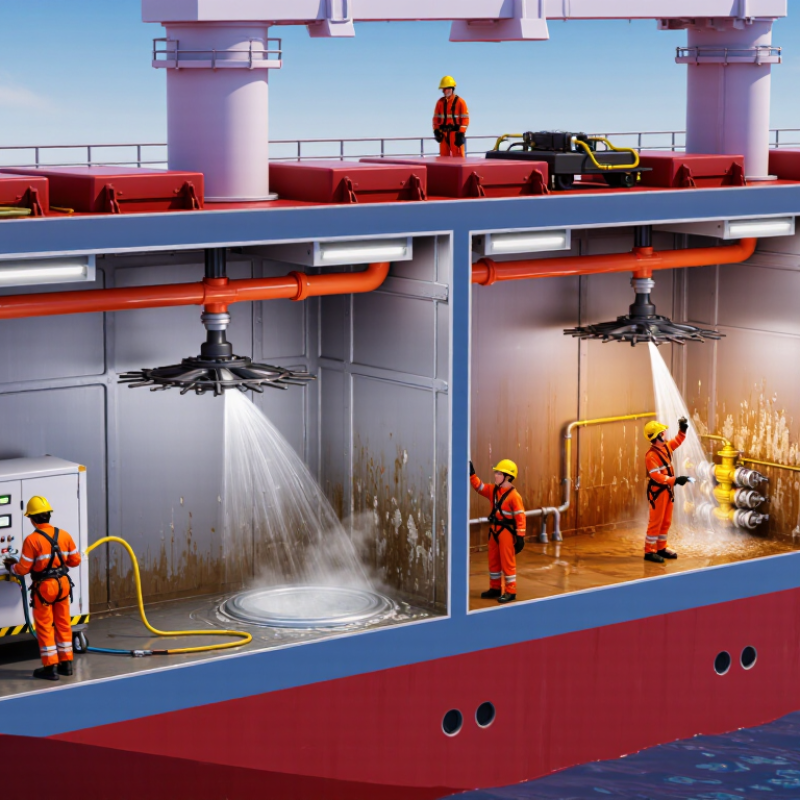
Chemical tanker interior cleaning begins with defining the scope, not opening the tank. Review the previous cargo, safety data sheet, coating limits, and discharge requirements. Residue may hide beneath frames, heating coils, ladder rungs, and pump wells. A written cleaning plan should specify washing temperature, detergent compatibility, ventilation, inspection points, and waste handling. Never mix residues without technical confirmation.
The main risks are toxic vapors, oxygen deficiency, flammable atmospheres, chemical burns, and unexpected pressure. A competent officer should isolate pumps, valves, and energy sources before work starts. Test the atmosphere at several levels, especially near the bottom and beneath structural obstructions. Check oxygen, flammability, and relevant toxic gases. Readings should continue during cleaning, not only before entry. Use suitable chemical-resistant clothing, gloves, eye protection, respiratory equipment, and intrinsically safe tools where required.
Tank entry is confined-space work. It needs a permit, communication, standby personnel, and a tested rescue plan. Ventilation must control vapor movement without creating new hazards. Portable lights can reveal oily films that water alone misses. A clean-looking surface may still fail a wipe test or cargo compatibility check. This is where practice can become careless. I have seen teams trust strong odors as evidence of contamination, yet some dangerous vapors have little smell. Inspection records should include photographs, test results, wash water observations, and corrective actions. Wastewater and residues must follow approved shipboard and port procedures.
Before anyone opens a chemical tanker tank, the crew should review cargo records, cleaning history, SDS information, and previous abnormalities. Residues may remain beneath frames, valves, and heating coils. Do not trust appearance or smell. An experienced officer confirms the tank’s construction, coating condition, residue behavior, and possible reactions with the planned cleaning agent. Water, solvent, or detergent selection must follow technical guidance, the vessel’s safety management system, and applicable maritime rules.
Tank entry preparation begins with isolation, not with a ladder. All connected lines, pumps, valves, and energy sources require positive isolation and verification. Ventilation should create measured airflow without spreading vapors into nearby work areas. Before entry, a competent person tests oxygen, flammability, and relevant toxic contaminants at upper, middle, and lower levels. Results belong on the entry permit. Continuous monitoring is prudent because conditions can change when residues are disturbed. Lighting, communication, retrieval equipment, protective clothing, gloves, and respiratory protection must match the identified hazards. A trained rescue team should remain outside the tank.
Practical preparation is rarely perfect. A blocked vent, unclear cargo record, or damp sounding pipe can undermine a careful plan. Stop work when readings drift, equipment fails, or the crew cannot explain the hazard. That pause may feel inefficient, but entering on assumptions is far more dangerous. Small inconsistencies deserve documentation, even when they seem inconvenient.
Chemical Tanker Interior Cleaning: A Step-by-Step Process
A safe cleaning process begins before anyone opens the tank. Review the previous cargo, safety data sheet, tank coating, and required cleanliness standard. Check MARPOL Annex II and the IBC Code before planning discharge or prewash operations. UNCTAD reported 12.3 billion tonnes of seaborne trade in 2023, increasing pressure on vessels to reduce turnaround delays. Speed, however, must not replace risk control.
Drain remaining liquid through approved systems, then ventilate and test the atmosphere. Never enter a tank without a permit, isolation, continuous monitoring, and a rescue plan. Use compatible water temperature and cleaning agents. Excessive heat can damage coatings, while weak circulation leaves oily films around heating coils and frame supports. Recirculate the wash solution, inspect difficult corners, and repeat the cycle when residue remains. Sometimes, the first wash looks acceptable. It is not.
Rinse with clean water until pH, conductivity, and visual checks meet the cargo receiver’s specification. Remove standing water with approved pumps, then dry the tank using filtered air or controlled ventilation. Inspect weld seams, valves, ladders, and coating blisters under strong lighting. Record temperatures, washing duration, test results, and waste movements. The IMO’s 2023 GHG Study estimated shipping emissions at about 1.056 billion tonnes of CO2 equivalent in 2018, so reducing unnecessary heating and repeated washes also matters. Cleaning plans are never perfect; actual residue, weather, and equipment limits require careful review.
The chart presents indicative planning durations for ten common chemical tanker interior-cleaning stages. Actual times depend on cargo compatibility, tank size, residue condition, cleaning temperature, equipment capacity, ventilation requirements, and the vessel’s approved tank-cleaning procedures. Safety checks, chemical compatibility verification, enclosed-space controls, and final inspection should be completed before the tank is released for the next cargo.
China Top 10 How to Clean Chemical Tanker Interiors?
Selecting Cleaning Methods for Different Chemical Residues
Chemical tanker interiors need residue-specific cleaning, not one universal routine. Begin with the cargo record, safety data sheet, and previous cleaning report. These documents reveal solubility, reactivity, corrosion risks, and required protective controls. Trained personnel should confirm ventilation, gas testing, isolation, and confined-space procedures before entry. Never rely on appearance alone. A tank can look clean while retaining harmful vapors or a thin reactive film.
Water-soluble salts often respond to controlled freshwater rinsing. Warm water may improve removal, but excessive heat can increase vapor release. Oil-based residues usually require an approved compatible detergent and mechanical circulation. Acids and alkalis need carefully selected neutralizing methods, based on tank material and residue concentration. Strong chemicals are not automatically better. They may damage coatings, seals, or inspection equipment. Polymer-forming residues require prompt action before they harden. Scrapers and non-sparking tools can help, but aggressive scraping may create surface damage.
Check the wash water continuously.
Residues can hide behind heating coils, stiffeners, and weld seams. Inspect these areas with suitable lighting after cleaning. A practical mistake is choosing a method because it worked on the previous cargo. Conditions change. Temperature, age, concentration, and coating condition all affect results. Keep samples, photographs, and final inspection records. Wastewater must be contained, tested, and handled through approved disposal arrangements, never discharged casually. When uncertainty remains, pause the operation and consult a qualified chemical-cleaning specialist.
| Rank | Typical Residue | Residue Characteristics | Preferred Cleaning Method | Typical Operating Range* | Recommended Sequence | Key Control Point |
|---|---|---|---|---|---|---|
| 1 | Water-Soluble Salts and Inorganic Brines | Crystalline or hygroscopic deposits; generally dissolve readily in fresh water. | Fresh-water rinsing with high-impact tank-cleaning machines; use warm water for faster dissolution where permitted. | Ambient to 60 °C; repeated rinsing until conductivity and visual checks meet the cargo requirement. | Drain and remove loose solids → pre-rinse → hot or ambient fresh-water wash → final rinse → dry. | Prevent salt redeposition by using low-chloride or demineralized water for the final rinse when required. |
| 2 | Acid Residues | Low-pH films or crystals; may corrode unsuitable steel and react with alkaline cleaners. | Water rinse followed by a compatible, mildly alkaline detergent only after confirming material compatibility. | Usually 30–60 °C; detergent concentration commonly 0.5–2% by volume, subject to the product safety data sheet. | Ventilate and drain → water pre-rinse → controlled alkaline wash → thorough fresh-water rinse → dry. | Never mix acids with hypochlorite or other oxidizing cleaners; verify pH before discharge or transfer. |
| 3 | Alkaline or Caustic Residues | High-pH, water-soluble residue; can cause severe chemical burns and attack some coatings or metals. | Large-volume fresh-water rinse; use a compatible mildly acidic neutralizing wash only under an approved procedure. | Ambient to 50 °C; neutralization should be gradual and monitored rather than performed by uncontrolled mixing. | Drain → cold or ambient water pre-rinse → detergent or controlled neutralization → final rinse → pH verification. | Use chemical-resistant PPE and confirm that the tank coating, heating coils, valves, and gaskets are compatible. |
| 4 | Vegetable Oils and Animal Fats | Hydrophobic, viscous films; fats may solidify when cooled and become difficult to remove. | Hot-water wash with an alkaline, emulsifying detergent and strong mechanical action. | Typically 50–80 °C; detergent concentration often 1–3% by volume, subject to the cleaner specification. | Warm pre-rinse → heated detergent wash → drain oily wastewater → fresh-water rinse → dry and inspect. | Avoid allowing fat to cool and harden; manage wastewater for oil and grease before disposal. |
| 5 | Mineral Oils and Lubricants | Non-polar, water-insoluble films ranging from light oil to heavy, persistent deposits. | Pre-wipe or drain bulk product, then use a low-foam alkaline degreaser or an approved hydrocarbon-compatible solvent. | Warm wash commonly 40–70 °C; solvent use requires closed handling and strict vapor-control procedures. | Remove bulk residue → detergent or solvent wash → collect wastewater or solvent → water rinse → gas-freeing. | Control ignition sources and static electricity; confirm that solvent vapors will not exceed exposure or flammability limits. |
| 6 | Aromatic and Oxygenated Solvents | Volatile, flammable residues; many are hazardous by inhalation and can attack coatings or elastomers. | Recover bulk liquid first; use compatible vapor recovery, controlled solvent wiping, or a water-based detergent if the residue is emulsifiable. | Prefer ambient temperature; heating is avoided unless specifically authorized by the cargo and tank procedures. | Recover residue → ventilate with approved equipment → wash using the selected compatible method → final rinse → atmosphere test. | Use intrinsically safe equipment, bonding and grounding; test oxygen, flammable vapor, and toxic vapor levels before entry. |
| 7 | Surfactants and Detergent Residues | Foaming, water-miscible films that may leave odor, taste, or surface-active traces. | Extended fresh-water rinsing using low-foam techniques and sufficient drainage time. | Ambient to 50 °C; continue rinsing until foam, conductivity, odor, and pH meet the next-cargo specification. | Drain completely → low-pressure pre-rinse → repeated fresh-water rinse → dry → visual and odor inspection. | Avoid excessive turbulence when foam is a problem; confirm that residues will not contaminate the next cargo. |
| 8 | Polymer, Resin, and Latex Residues | Can form sticky films or hard, cross-linked deposits; cleaning difficulty increases after drying or curing. | Immediate warm-water or compatible detergent wash; for cured deposits, use approved mechanical removal or a specifically compatible solvent. | Usually 40–70 °C for fresh residue; avoid heat that may accelerate curing or damage the coating. | Remove bulk while wet → detergent or approved solvent → mechanical spot cleaning → final rinse → detailed inspection. | Do not use abrasive tools that can damage tank coatings; verify compatibility with the polymer and lining material. |
| 9 | Sulfur-Containing or Odorous Residues | May leave persistent odor and can release toxic gases, especially when disturbed or mixed with incompatible chemicals. | Controlled ventilation, water or detergent washing, and an approved odor-removal treatment selected from the cargo safety data. | Usually ambient to 50 °C; treatment selection depends on hydrogen sulfide, mercaptan, or other constituent levels. | Drain and isolate → atmosphere monitoring → pre-rinse → detergent wash → final rinse → repeat gas testing. | Treat the tank as potentially toxic until proven safe; never rely on odor alone to assess atmospheric conditions. |
| 10 | Pigments, Dyes, and Fine Powders | Loose particulate or strongly staining deposits; may become airborne and contaminate subsequent cargoes. | Careful vacuuming or wet collection followed by a compatible detergent wash; use high-pressure water only after loose powder is controlled. | Ambient to 60 °C; minimize dust generation and confirm whether the material is combustible or toxic. | Recover dry material safely → wet pre-rinse → detergent wash → final rinse → filter or settle wastewater → inspect. | Prevent dust clouds and cross-contamination; protect pumps, filters, valves, and wastewater systems from suspended solids. |
*Typical operating ranges: Actual temperature, concentration, pressure, contact time, and equipment selection must be established from the cargo safety data sheet, tank-coating compatibility data, vessel procedures, and applicable port or environmental requirements.
Final acceptance checks: Visual cleanliness, absence of loose residue, odor assessment, pH, conductivity, chloride or other cargo-specific tests, drainability, and atmosphere testing should be completed before the tank is released for the next operation.
After cleaning a chemical tanker interior, inspection must prove more than a bright-looking surface. A visual check should cover the tank walls, weld seams, corners, heating coils, ladders, valves, and sump. Use strong lighting and record photographs with tank numbers and timestamps. A clean appearance can still hide thin residue.
Testing adds evidence. Measure rinse-water pH and conductivity with calibrated instruments, then compare results with the agreed acceptance limits. Swab tests may help identify remaining contamination on difficult areas. Check for unusual odor, slippery films, discoloration, or blocked drains. Keep sampling tools clean. Otherwise, the test may create a false result.
Documentation should connect every finding to a person, time, location, and action. Record the cleaning method, water quality, detergent details, ventilation period, inspection readings, equipment calibration status, and corrective work. An independent inspector can review the final condition when cargo requirements demand stronger assurance. Our first checklist was too general; it missed a residue mark near a valve seat. That small failure changed the process. No guesswork. If a reading looks abnormal, stop release, investigate the cause, and repeat the inspection after correction. Store signed records securely, with clear links to the tank and voyage reference.
Review the previous cargo, safety data sheet, coating limits, cleanliness standard, and discharge requirements. A written plan matters.
Workers may face toxic vapors, low oxygen, flammable atmospheres, chemical burns, or unexpected pressure. Some vapors have little smell.
No. Tank entry requires a permit, equipment isolation, communication, standby personnel, continuous monitoring, and a tested rescue plan.
Test oxygen, flammability, and relevant toxic gases at several levels. Check the bottom and hidden areas. Continue testing during cleaning.
Use chemical-resistant clothing, suitable gloves, eye protection, respiratory equipment, and safe tools when required.
Inspect frames, heating coils, ladder rungs, pump wells, weld seams, valves, and corners. Strong lighting can reveal thin oily films.
Confirm compatibility with the previous cargo, tank coating, and cleaning method. Excessive heat may damage coatings.
Do not rely on appearance alone. Repeat washing if oily films, discoloration, slippery areas, or abnormal test results remain. The first wash may look acceptable.
Measure rinse-water pH and conductivity with calibrated instruments. Use swab tests on difficult areas when needed.
Record photographs, test results, wash temperature, cleaning duration, ventilation time, equipment calibration, waste movements, and corrective actions. Include tank numbers and timestamps.
Cleaning a chemical tanker interior requires careful planning, hazard control, and strict attention to safety. This guide explains how to clean the interior of a chemical liquid tanker by first assessing the previous cargo, identifying residue hazards, reviewing tank condition, and preparing ventilation, protective equipment, isolation procedures, and safe entry controls. It emphasizes that tank entry should only take place when the atmosphere has been tested and confirmed safe by trained personnel.
The cleaning process includes removing remaining liquid, selecting suitable rinsing agents or mechanical methods, and applying controlled washing techniques according to the residue’s properties and the tanker’s construction. Different chemical residues may require different temperatures, pressures, cleaning solutions, or neutralization procedures. After cleaning, the tank should be inspected for visible contamination, tested when necessary, dried properly, and documented with cleaning records, safety checks, and approval for the next approved cargo.

Flex Truck